This guide will walk you through preparing a new project for creating a Melora plugin bundle and installing all necessary components.
For simplicity this guide will only show screenshots of Visual Studio 2022, but the process should be similar on other IDEs.
Requirements
- An IDE with support for .NET and WinUI app development
- Windows SDK version 10.0.17763.0 or higher
➔ Suggestion: Visual Studio 2022
Start Your Plugin
Step 1: Clone/Fork Melora
Cloning or forking the Melora Repository is optional, but it can make development and debugging significantly easier. It allows you to debug your plugin directly in Visual Studio and see how it interacts with the actual Melora application.
After you have cloned/forked the repository, please first make sure you are even able to build and run Melora.
For simplicity, the following steps assume you're developing within the Melora solution. However, you can easily adapt these instructions if you didn't clone/fork the solution.
Step 2: Create a new Project
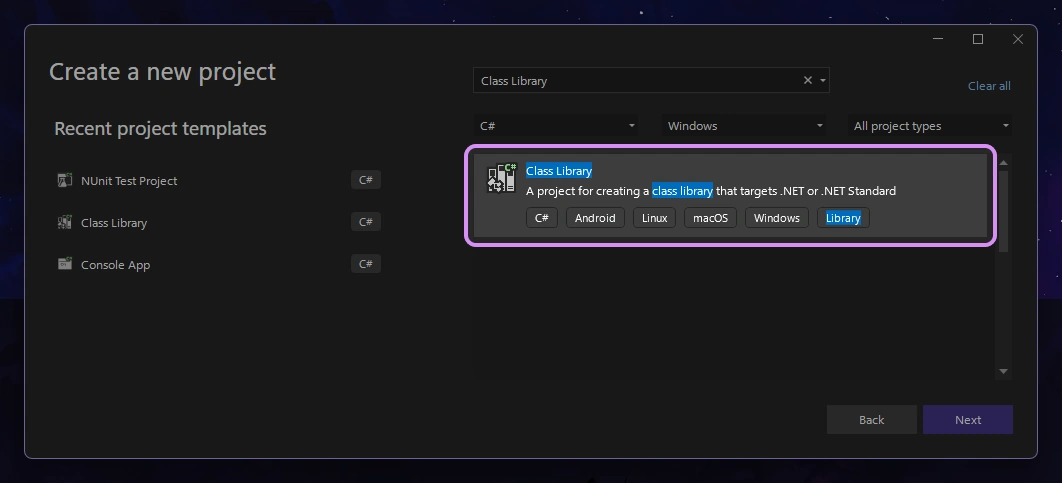
Start by creating a new project of type Class Library that targets .NET 8.0 inside the "Plugins" folder - next to the already developed plugins.
You can choose any name for your project, but it's recommend following the naming pattern: Melora.{PlatformKind}.{Name}. Here, {PlatformKind} indicates the type of plugin (e.g., "PlatformSupport", "MetaData", ...), and {Name} is a unique identifier for your plugin.

Step 3: Installing the API
To interact with the Melora client, you will need to reference the shared API.
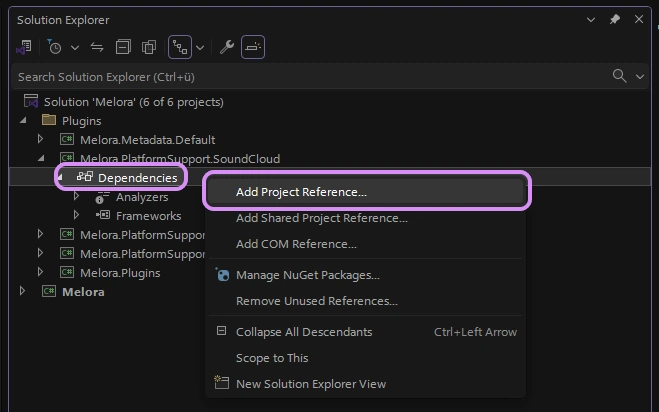
If you have cloned/forked the Melora Repository, just expand your new project > right click on "Dependencies" > press "Add Project Reference". Now check the box for "Melora.Plugins" and press "OK".

Note
If you haven't cloned/forked the Melora Repository you can instead install the Melora.Plugins APi via the .NET CLI or NuGet Package Manager.
dotnet add <PROJECT NAME> package Melora.PluginsStep 4 : Create a Plugin Manifest
So that Melora can display your plugin you'll need to provide some basic information about it. This manifest is also useful if you plan to publish your plugin to the official Melora Plugin Collection.
- Create a new file named "Manifest.json" in the root of your project.
- Set the "Build Action" of this file to "Content"
- Set "Copy to Output Directory" to "Copy always" or "Copy if newer".
To see how a manifest should be structured and what it should contain, please see here.
Step 5: Modify the .csproj File
- Add
<EnableDynamicLoading />: This setting allows your assembly to be dynamically loaded by Melora. - Exclude
Melora.Pluginsassets: Ensure that Melora.Plugins is excluded from the build, since the client will provide this API. - (Optional) Add Post-Build script: This script automatically creates the .mlr plugin bundle and moves it to the Melora Plugins directory, saving you from manually doing that each time you modify your plugin code. Please note that this will only work if you have the cloned/forked Melora project in the steps before!
<Project Sdk="Microsoft.NET.Sdk">
	<!--  General  -->
	<PropertyGroup>
		<TargetFramework>net8.0</TargetFramework>
		<ImplicitUsings>enable</ImplicitUsings>

		<Nullable>enable</Nullable>

		<EnableDynamicLoading>true</EnableDynamicLoading>
	</PropertyGroup>

	<!--  Dependencies  -->
	<ItemGroup>
		<ProjectReference Include="..\Melora.Plugins\Melora.Plugins.csproj">
			<Private>false</Private>
			<ExcludeAssets>runtime</ExcludeAssets>
		</ProjectReference>
	</ItemGroup>

    <!--  Resources  -->
    <ItemGroup>
    	<Content Include="Manifest.json">
    		<CopyToOutputDirectory>Always</CopyToOutputDirectory>
    	</Content>
    </ItemGroup>

	<!--  Copy to Melora Plugins directory  -->
	<Target Name="PostBuild" AfterTargets="PostBuildEvent">
		<Exec Command="powershell Compress-Archive -Path '$(TargetDir)*' -DestinationPath '$(TargetDir)\PluginArchive.zip' -Force" />
		<Exec Command="powershell New-Item -ItemType Directory -Path '$(SolutionDir)\Melora\bin\x64\$(Configuration)\net8.0-windows10.0.19041.0\Plugins' -Force" />
		<Exec Command="powershell Copy-Item -Path '$(TargetDir)\PluginArchive.zip' -Destination '$(SolutionDir)\Melora\bin\x64\$(Configuration)\net8.0-windows10.0.19041.0\Plugins\$(ProjectName).mlr' -Force" />
	</Target>
</Project>
Step 6 (Optional): Automatically Build
So you don't have to manually click the Build button in Visual Studio every time you change something in your plugin, you can make it automatically build when starting Melora from Visual Studio.
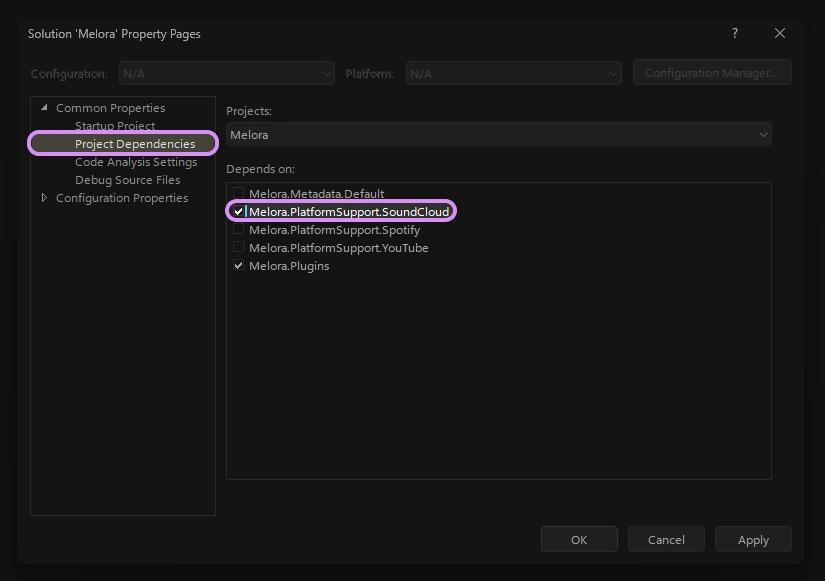
To do this just right click on the "Melora" Solution, press "Properties" on the bottom. A new popup will appear, under "Common Properties" select "Project Dependencies" and check the box for your plugin project.
Note
Please note that this will only work if you have the cloned/forked Melora project in the steps before!

That's it!
You’ve made it! As you can see, creating a custom Melora plugin isn’t too difficult. Now you’re all set to start developing your own plugin and to expand Melora’s capabilities!
To add support for any new sources, check out the Creating a Platform-Support Plugin Guide. If you want to customize track metadata, refer to the Creating a Metadata Plugin Guide.
